
It sure doesn't look like I accomplished very much looking at the photos for today, but it feels (physically) like I did...man! I think that is due mostly to the sawing, going up and down the basement stairs a few times, working in the basement in between studio sessions, using the box cutter knife on the cardboard...stuff like that.
I started out today adding more paper to the cat-king-creature. There is still quite a bit to do on him.


 |
| first layer of white paper on the face and pink on the nose |
 |
| lots of layers later...I hope it looks good when it dries |
 |
| remind me not to get those wonderful alcohol inks ANYwhere NEAR plaster cloth projects ever again...they are just not meant for this...they re-wet and re-activate and bleed through and get in the brush...gah! |
 |
| looks nice now while it is wet...we'll see how it turns out when it dries |
Then I moved on to the bear-like guy. Ditto...still lots to do.
 |
| lots of white paper on the face/muzzle |
 |
| then one layer of pale blue...hopefully it will dry lighter |
I am struggling with the camel-like creature's legs. They are just not looking right to me. I know they won't be anatomically correct, but I need them to look like they could support him at least. I am even having a problem with drawing them in my sketch book while I look at a copy of a real camel or two. Time for some sawing...then back to the sketch book and thinking. I have a feeling this guy is going to linger in non-assembled state(s) for a long, long time.
 |
| even if I angled his legs severely and used a pool ball joint, he would look like he was on his tip toes and I don't think he could stand on his own |
 |
| well...I can't get them any shorter -- LOL |
 |
| I need to make changes to the hips/haunches or something...all of his parts are together...this is just going to be a very long-term project...but I will figure it out |
And speaking of very long-term projects...
The crocodile-like guy was the very first thing I tried to make with various papier mache techniques. I followed a few different books and added things in different styles and then stumbled upon a package of plaster cloth that was in my studio stash from years before this project even. Out of all of the techniques and methods and formulas plaster cloth won. I am still learning new things pretty much every time I use it -- I just love it.
ANYway...looking back in the blog I see that I started the crocodile-like guy way back on June 24, 2010 -- geez! Then he languished again until May 19, 2011. And then on Sept 7, 2011 I got up the nerve to put him on a tomato cage.
I have been wanting to do something with him (off and on) many times since then, but the main problem is that he is horribly unbalanced and really testing my construction skills. I think a lot of the projects that get shelved for a while are supposed to wait until I've learned other things/tricks/steps while working on totally different things. I don't know everything there is to know about plaster cloth (and I probably never will) but I sure am enjoying the process. I am really glad to have blogged this long and photographed as many steps as I have because it really helps me when I try to see what I did on previous pieces and remember what worked and honestly, I really do forget from project to project how things went together.
Okay -- so today my Universal collaborator(s) started to show me a few things for the croco-creature.
 |
| sticking out of the closet in the wet plaster cloth studio |
 |
| sort of what I might be going for -- the idea comes from one of my all-time favorite Tyrannosaurus Rex songs "Warlord of the Royal Crocodiles" -- I think the staff in his hand might help a little with the balance and weight distribution |
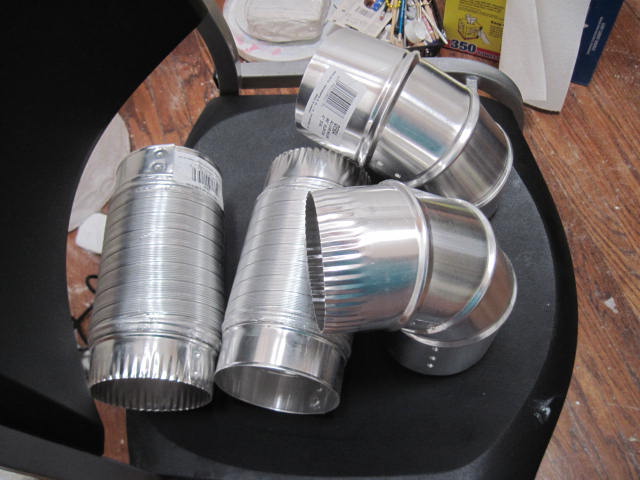 |
| while working in the basement I decided to go "shopping" when I was done with my chores down there -- voila! -- I still had two sets of flexible aluminum clothes dryer vent ducts and dryer vent elbows (yes, I looked up the correct names for them) |
 |
| at first I thought I might put the "arm" assembly right there in the roundy part -- but the other side isn't as roundy |
 |
| I traced around one end of a dryer vent elbow on a piece of medium-weight cardboard from a box I'd broken down earlier, then I cut it with the box cutter in pie shape wedges but I found it wouldn't make a round enough hole -- so I had to make more cuts -- and that worked incredibly well |
 |
| trying it out |
 |
| the two vent pieces are cool because you can position them any way you want -- they turn completely around in every direction -- and I can stretch the arms out longer if it turns out I need to later on |
 |
| in all the time this guy has been waiting around, he has fallen over a few times...but this is the only damage that has happened -- just one broken glow-in-the-dark tooth -- and thankfully it was a clean break -- easily fixed when the time comes |
 |
| geez...what a goofy shot |
 |
| from this view you can see the container of about 10 pounds of cat litter to counterbalance him |
 |
| since he is a Royal Crocodile he will need a crown...this is my first attempt at a plaster cloth crown...made several years ago |
 |
| but I made it for ME...plus, it is too big for the croco-creature |
 |
| a better look at the counterweight sitting on the back of the tomato cage |
 |
| thinking... |
 |
| he will need hands... |
 |
| and a staff of some sort |
 |
| not bad...still needs a lot of work, but he is coming along fine |
 |
| whoa -- now THIS is disappointing -- that alcohol ink is bleeding through from somewhere -- there must be a trace of it in the brush or something -- there was NO alcohol ink on this part of the face when I started this morning -- gah! |
 |
| again -- more alcohol ink bleed through -- I might be able to live with some of this on the paws...maybe not |
No comments:
Post a Comment