Showing posts with label plaster cloth rabbitish guy. Show all posts

Saturday, August 30, 2014

Day 242 - 365/2014 (updated)

Day Two Hundred Forty-Two

Wow.  It has been quite a while since I have worked on the plaster cloth rabbitish-guy.  Here are some progress/process photos of today's multiple work sessions. 
One -- coming up with the hands construction.  I had to resort to holding up my own hand to see which direction I needed to go with and where the thumbs went.  This session was probably the longest -- a couple of hours +.  It took a while to determine the size, the materials and how to anchor them with a wrist/forearm.  I wanted (needed to) work on both hands in the same sitting so that I could keep them as even as possible.  I also needed to do it in one session so that I could remember how I did it.  As it was, the second hand was made in a slightly different way but with the same parts as the first one.
The rabbitish-guy "before".
The sketch I made a while back.
Using my own hand to make sure I put the thumbs in the correct place...and to get a basic shape to build the fingers on.
Keeping in mind that these are not human hands, they didn't turn out too bad.
Making sure I left room for layers of plaster cloth to go on the wrist/forearms.
The parts for hand assembly number two.
Ta-daaaaa.
Securing the fingers and thumbs more securely in place.
Adding some pads/shapes to the palm areas.
Hand number one -- I tried to pre-shape the fingers into more of a "gona getcha" pose.
Yeah...not too bad.

Two -- after taking a short break I came back in to try to see if the wrists would fit with some Scott paper rags to hold them in place...just to see if I was getting the hang of the bends in the fingers and positioning in the sleeves.  This actually took a bit of time, too.

Three -- after a break to feed the cats and sit in my recliner for a short while, I came back in to put the first layers of plaster cloth over the hips/haunches area and try to get some shape overall, including underneath the plaque at the bottom of the torso.  This included a bit of shaping and holding the plaster cloth in place for a bit so it could start to set up.  I probably should have crammed more of the wet plaster cloth into the Scott paper rags inside of the plastic cups (under the masking tape) but I think it will be fine...I tightened and shaped the outside as I worked.  This area will still need quite a bit of layering of plaster cloth.
The area to be worked on "before".
The area "after".
Another view.  I know it looks pretty odd right now but I have an idea for this.  It will be something in between hips and haunches, but I want it to be less haunchy/animaly and more hippy/humanish.
Four -- the final session for tonight.  I covered the hands with a light layer of plaster cloth and tried to keep the bends in the fingers.  I didn't want the hand to become too bulky (as they have in the past in other projects) so I want them to firm up a bit before I add the next layers.  I will need to keep the very ends of the forearms fairy wet and slippery and also prepare the inside of the sleeves with one thin wet layer so that they join well.
The hands, drying.
I have been trying to think of a shape or form I could use to work plaster cloth over for the transition from waist to haunches/hips...I think I found something that will work (I can always pull it all back off later)...I cut a cream cheese container in half and cut the rim off, too.
Secured pretty well...at least it is a start...this still needs a lot of thought and work.
Another view.  I am also trying to think of how the clothing can be built on to cover up the odd shapes.
Okay!  Enough for one day.  Man...I forgot how much reaching and stretching this work takes...I may be achy for the next couple of days...LOL.


Monday, July 29, 2013

365/2013 - Day 210

building a foot

Yes, I have been avoiding this for five days now.  I need to figure out how to be able to use the fabulous little pink shoes without totally wrecking them and have the whole shebang resemble something like a foot/leg.  Where to start?  How???  Cripes...I really set myself up a lot, don't I?

Even though this just happened, I don't remember every little detail so I will just show the photos and hope I can recall what was going on...LOL.

Okay...when I first started looking at the shoes tonight I found I could pull the insole out.  I had the idea to try to build up the foot directly on the insole since it (presumably) already fits.
I used Scott Rags and masking tape and ended up having to trim the sides a bit.
I think because of the remaining bits of sticky stuff on the underside of the insole the piece doesn't want to fit exactly.  I can trim some more off as I go along.  I will probably have to anyway because the insole will most likely swell a little when it gets wet and who knows what the plaster cloth is going to do.
I trimmed it a little more and the insole fit better...I will need to build a heel, too.
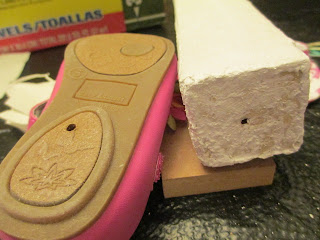
But first -- I needed to drill a pilot hole for the screw in the much later stages.

Yes, I suppose I am a bit delusional, thinking this is going to save the shoe from the plaster cloth.
Okay -- so I put a few layers of plaster cloth on the front of the foot.
Here is how the bottom of the insole looks...this is why it doesn't want to slide in easily, but I need that plaster cloth there.
I couldn't find my skewers (to keep the pilot hole) but I devised this instead.  I want the foot/shoe/thing to dry flat.
I had to test it -- it needs to dry all the way totally -- but I needed to see if I should even continue with this.  I didn't want to push on it too hard to smash it into the toe of the shoe because the plaster cloth is set, but not hard.  See how the insole is bunching up at the heel?
The front part doesn't look too bad -- I am very surprised and happy (so far).
I had to really push the leg into the bunched up insole, but look -- it kind of/sort of makes it look like a heel.
Well...it is filled in anyway.  I doubt it will stay this way when it dries.
I think I am going to need to cut off this part of the insole and just build the rest of the foot around the leg and right into the shoe.  We'll see what happens when the insole dries all the way.

Wednesday, July 24, 2013

365/2013 - Day 205

a great find!

I wasn't planning on stopping at Target today while I was making my list of errands this morning, but it just happened that everything fell into place and I feel like maybe I was "sent" there...by those who will not be named.

My first thought for the feet/shoes for the rabbitish/catish guy was that I wanted to buy a pair of little girl Mary Janes and plaster cloth over them and incorporate them into the piece.  I also thought about sculpting shoes/feet, and I thought about constructing some sort of feet (or shoes) from scrap wood or MDF around the house.

I knew if I was going to purchase a pair of actual shoes that I didn't want to spend very much money on them.  I had considered going to resale shops or Salvation Army or something...but that would involve much more time and energy than I wanted to spend -- plus it might land me in the midst of kids in a store and if you know me at all, you know I didn't want that.  But the planets were aligned at the moment I walked in to Target.  The shoes section was pretty much deserted and there was ONE pair of Mary Janes -- one perfect pair of pink Mary Janes in just the right size...and with such cool flowers!  AND they were on clearance -- $3.88 -- I could not believe it!   (Other little shoes on the same shelf had price tags of $20 on the average.)


Oh. Man.
The plaster cloth is no where near dry on the legs yet, but I had to try them out.


I could not have dreamed this better.
Then I had to try to balance the torso on top to take a picture...this guy is very unstable right now and top heavy and I was trying to do this with one hand.
For safety's sake I stacked/leaned the parts up against the wall -- Twink is standing on his hind legs outside of the door looking in...you can just barely see his eyes...at the left side of the door.


NOW I will need some time to plan this out.  I really hadn't figured on finding a perfect pair of shoes that I would like to try to leave as-is.  This is going to be tough...but I will come up with something.  I love those shoes!

Tuesday, July 23, 2013

365/2013 - Day 204

that collage really ties the room together

Yep...much like The Dude's rug, this collage by my friend Joan Potter Thomas really ties this room together.  Everything about it "works".  I LOVE IT!!!  


I wish I could take a photo of the ENTIRE room so you could see how great this all looks -- maybe you should just come over and see it in person...let me know before you come, though.
A close up of "Tribal Flag" by Joan Potter Thomas.

And now...back at it again...back to prepping and plaster cloth'ing parts for guys.

Look, Leann -- I am really using the sketch book you gave us!
Working out how to put this rabbitish/catish guy together.
One "leg" covered with plaster cloth, one more to go...both were covered with masking tape first and the pilot holes were drilled in both ends.
All done...this is as much as I can do today.  Those are the wooden pieces that Joan's husband Andy cut for me in his workshop on Sunday...thanks again, Andy!


Saturday, July 20, 2013

365/2013 - Day 201

worky work

Today was full of worky work...sanding wood, cutting wood...that kind of stuff.  Plus many trips to the basement and back up...and then out running for a couple of errands.  I am so worn out...man oh man.

I went "shopping in the basement" to see if I could find a round wooden plaque for the rabbitish/catish guy's torso.  I found this wooden circle (sold as a clock part) but it was too big.  Darn...back down to the basement.
I was thinking yesterday that I might have more of that wood from yesterday's blog post and guess what -- I found more!  It was from this pile of scraps that were left over from tearing down a partial wall by my furnace/water heater/etc.  Now I am glad I never took them out to the curb!  It is old wood and there are nails and the surface is rough, but it can be sanded enough to be able to handle it safely...and then cover with plaster cloth.
After thinking about it for a while (while I was back upstairs fetching a hammer to pull nails with) I thought I would look just one more time...there HAS to be a smaller round wood plaque somewhere in the basement.  I found ONE!!!  Back upstairs for a bit.
Back downstairs again.  Gah -- time to pull nails and sand this piece of wood.  Luckily I have a Mouse electric sander but it is so vibratey -- it saves time but it also wears your hands/wrists out using it.  Back upstairs again.
I tried out the smaller wooden plaque.  It almost fits.
Time for the handy dandy tin snips. 
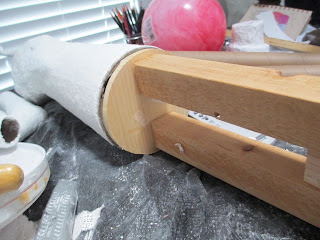
I think this will work out fine.  I will need to use the rubber mallet and tap the plaque into place...but yes, I think it's going to work.
And back down to the basement to cut the sanded wood into two pieces.  Now back up to Studio B again.
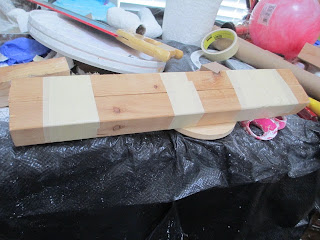
I set the pieces in place to see if they'd (theoretically) work -- it looks like they will.  Yay!
But at this stage I have the problem of uneven ends on the wood.  I measured pretty well, but my cutting with the hand saw leaves a bit to be desired.  Back down to the basement to try again.  But first I taped the two pieces together and considered taking them to Home Depot to see if they could true them up for me.
Back upstairs again FOR THE LAST TIME TONIGHT I SWEAR.  I tried -- I really tried to do this one more time.  I sanded the board, but I just couldn't saw it.  Luckily, my good friend Joan's wonderful husband Andy has a shop in their basement and has agreed (through a message with Joan) to chop saw my ends for me.  I will take both the cut and the uncut wood tomorrow to their house to see what will be easier for Andy to work with.  I am done for tonight.

Related Posts Plugin for WordPress, Blogger...