Showing posts with label plaster cloth experiment. Show all posts

Friday, December 23, 2011

365 Day 357

more work on the experimental plaster cloth dog

I will be a happy happy girl when television programming goes back to its regular schedule after the first of the year. I don't usually try to work on stuff this early in the day...but my day(s) right now are really thrown off without my usual working-from-my-chair-in-front-of-tv routine. I am not complaining or bah-humbugging...I am just saying.


The experimental plaster cloth dog laying over on its side so that I can lay plaster cloth on the inside bottom of the base.


How it looked before the plaster cloth.


Much better after plaster cloth.

I am doing this step for two reasons. Because this is the experimental piece, I can see if I need to do the inside of the base...see if it makes a difference in the structural strength of the piece.

Reason #2 is because I am considering leaving the middle of the base "open" and since you'd be able to see inside of the bottom of the base, I'd rather have people looking at a finished-looking interior of painted plaster cloth rather than the unfinished bags and tape.


Longer shot...you can still see way up inside of the top tier where I didn't add plaster cloth to the bags and tape.

I was just now thinking there is still time to apply the plaster cloth -- but that would kind of defeat the purpose of the experiment.


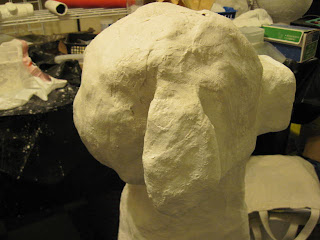
The front of the piece with the wacky floppy (yet rigid with plaster cloth) edge.


View from behind.


I really need to start thinking about how I want to finish this guy. I know he is a "working dog" and I know it is a male in a shirt and tie and pants with belt...if I finish the whole base. If I leave the middle of the base open -- I don't know -- I think I would want something to relate to him in there (still a working dog). Lots to think about...and it could simply come down to how the piece feels after the bottom of the base dries.


In the meantime, I took some of the photos and doctored them a little so I could see the details better. Then I traced the basic outline and tried to draw on what the painted guy might look like with shirt, collar and tie, arms and sleeves with cuffs, paws with claws, pants and a belt.


Rear view. I figured the wonky edge might be his shirttail hanging out of his pants.


Front view. Proportions aren't exactly right...but this is just a preliminary ideas stage.


Wow -- it is only 3 o'clock! I have a whole lotta time to kill before bedtime tonight. My routine is really messed up. I guess I will have to find some more projects to work on...

Thursday, December 22, 2011

365 Day 356

back to work on the experimental plaster cloth dog

My new box of plaster cloth arrived today -- two days early! I am running nearly out of the plaster cloth left in the older box I have been working out of and now that the new box is here I feel like I can work on a few other things while still finishing up on the construction of the cat-creature.


Here is the experimental plaster cloth dog. He has held together pretty well (so far)...but now what do I do with the base?

I put him up on the big table in the studio to try and think of a way to finish off the base with the Trader Joe's paper bags (that I have been using to build him).


There was just too much plaster cloth and dust on the studio table to work with masking tape so I took the dog guy out to the dining room table.

There was also more room to lay him out.


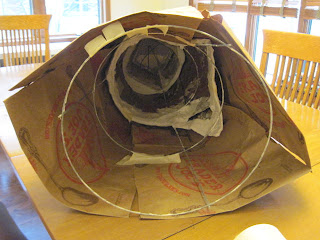
This is what the inside looked like after I tried to continue wrapping bags around the tomato cage in the same fashion as the upper part of the piece.


This is just not happening. There are already too many HUGE gaps on the inside between the untouched bag surfaces and the tomato cage. The outside flat surface with the plaster cloth is amazingly rigid.


Every time I started over and tried to smooth out the bags, it just wasn't working. There was too much of a gap on the inside.


Sitting at the uncluttered dining room table I was able to have a major "duh!" moment -- if I cut the plaster cloth into triangle-shaped pieces so that they will fit to curves, why couldn't I do the same thing with the paper bags?

It worked...more work, but it lays flat outside AND inside.


I just kept turning the triangles to fit and slightly overlapped them.


But now what?

The upper section retained the wacky floppy shape of the overlapping flap of plaster cloth/paper bag on that one corner. It looks kinda cool, but I think I may have to cut it off.


Another "what now" view.


I still don't know how I will close up the middle, but at least I can get the plaster cloth on the bottom of the base.


Back to the big table work area in the studio. The dog guy goes over on his side...only a teensy tiny part of the bottom of the base is actually touching the table, so I was able to apply the plaster cloth in three layers and then turn the dog guy over and do the other side -- without having to wait for it to dry (like the cat-creature). Plus, this is an experimental piece...let's see what happens.


Well, he made it (so far). Now he can dry and I can try and come up with a way to close up the middle.

I really have no idea (right now anyway) so I am going to leave him for tonight and keep thinking about it.


And I know I will be able to leave the piece alone tonight because Carla came over today and brought me some Christmas presents...such a thoughtful girl, that Carla.


The subtitle of The Confident Creative is "Drawing to Free the Hand and Mind".

The illustrations and exercises look really cool. I think I will be spending quite a bit of time with this book tonight -- THANKS, Carla!

Friday, December 16, 2011

365 Day 350 -- another round

more experiments on the experimental plaster cloth dog

I wanted to try to get the dog's head rounder.


Here is how he started out tonight. He basically has 1-2 layers of plaster cloth all over him so far.

There are areas where he just has masking tape "bridges" linking base elements that I am building on. Tonight he is getting a bit more reinforced as I go along, but he is also getting some more experiments with unlikely materials.


I just lightly folded and bunched and shaped a piece of butcher paper to round off the top of his head a bit.


Then I added a folded over piece of aluminum foil to protect the butcher paper and to be able to try and shape it a little. I was thinking that the aluminum foil would hold a shape over/on the paper.


Then I started to cover it with masking tape.


I pushed in and squished in places and the tape held it even more.


Next, the plaster cloth.


There were some major dips in the shape, so I filled in with wadded wet plaster cloth and pushed it into the dip and then smoothed it...


...and covered it with a triangle to further smooth it.


Then the back of the head was really looking flat so I glanced around and found a wad of "I just used this to mop up some water but it isn't totally wet, but it isn't totally dry" paper rags (Scott Xtreme Rags) and held the wad on with one hand and very lightly applied a piece of plaster cloth with the other hand. I only smoothed the very very edges of the plaster cloth so that it would keep its shape for a bit...then I moved to a different spot so it could harden a little.


I was very surprised that it seemed to be working.


I went back a few minutes later and put another few plaster cloth triangles over the area and smoothed a little farther in, but not totally.


He's starting to look a bit doggier to me. (He looks better in person.)


I think it will take a few days before I can put on another layer. I don't want it to collapse, but I don't want it to get absolutely totally dry before I put another layer on.


This post is mostly so that I can document what I've done in various stages of this experimental piece. I do not mean to suggest that this is a good way to work with plaster cloth...LOL.

Oh -- and I think I may have figured out the collar for his shirt, too.

Tuesday, December 6, 2011

365 Day 340

tip him over and get started!

Today I put the first section of body/clothes on the experimental plaster cloth dog.

I have no idea how well paper bags are going to work as foundation for the plaster cloth but that is what this dog guy is all about...experimenting.


I tipped him over on his side because I needed to work inside first. The paper was going to get pretty floppy, so I needed to secure it as best I could to try and keep it somewhat stable.


This is what he looks like inside...not much there.

And I was wondering how I would get that overlapping (pointed) piece to conform more to the tomato cage because it is pretty far away from the framework.


The floppiness of the paper bags with the plaster cloth applied to it helped to make the overlapping piece mold itself into a useable shape when I turned the dog on that side.

Amazing.

I hope it stays like that. I hope that this will be strong enough to keep building on.


A closer look at the inside "structure" (or lack thereof).


He is going to need to dry really well before I do anything else to him I think. I am also expecting him to be pretty brittle so I will need to be careful.


For now he can look towards the window.


I also plaster cloth'd his tie parts today...different session.


before...


...and after.


And I just wanted to point out -- one more time -- that I do blog entries like this mainly so that I can see what works (or what doesn't work) and how I did it. This is in no way meant to be a tutorial on how to use plaster cloth...LOL.

Monday, December 5, 2011

365 Day 339

experimental paper/cardboard clothes for an experimental plaster cloth dog

Whoa -- that was waaaaaaaaaay too much like math and geometry...owwwww...headache.
(For real.)


On Friday at the Northville Art House there was a great bag of Trader Joe's paper bags (with handles) that was going to be recycled. I asked if I could take it home. I was just planning on using them as bags around the house. Tonight they are becoming "clothes".


I do not sew. I have never made a shirt in my life. I am reeeally really bad at math and geometry, no lie. I am not kidding you when I tell you that I have been at this since 8:05 tonight and I am just now writing this at 9:45. It is probably not as hard as my brain makes it.

I knew things would get a little more difficult when I started to turn corners or had to overlap...I was ready for that. LOL.

Pulling the handles off of the bags, cutting the bottoms off and then flattening out the sides (but leaving them double-strength) and taping them to the dog was not a problem at all. Easy.


Letting the bag sides go where they wanted to go and overlap wasn't that bad either...I was expecting that, too.

I even figured a way to attach the bottom edges to the middle ring on the tomato cage.


Another view of the overlapping parts.


This message was on the underside of the bottom of the bag -- it cracked me up.

I used this piece to find where the collar would go...approximately.


I used the handles to mark all the way around his neck where the collar of his shirt will go.


I made him a cardboard tie in two pieces. This took three tries. Unbelievable.


The hardest part for me was those stupid stupid horrible stupid triangles that are the front of the collar. I COULD NOT FIGURE THEM OUT. I was nearly in tears by the time I was done, I was so frustrated. I had to keep turning them over and over and over. Oh. My. Goodness. It is like there is a chip missing in my brain...the one that can do shapes and mirror images. I have trouble packing a suitcase, too...LOL.

And the thing that is still bothering me (a bit) is that this construction will all have to come off (except for the bags around the tomato cage) so that I can plaster cloth the tie parts and the collar parts...and then attach them to the shirt in layers.


I am fairly happy with what I accomplished tonight.

1. I am teaching myself to do this.
2. I do not sew.
3. Math and I do not get along.
4. I can do this. I will do this.
No one has a gun to my head. I choose to do this.


This is good for tonight. I need to think about this more. I also need to go and block out the distant voice in my ear that is saying "Heh, wait till you have to paint this thing."

Saturday, December 3, 2011

365 Day 337

a plaster cloth dog experiment gets ears

Tonight I put the aluminum foil ears that I originally made for the goat-like creature onto the experimental dog. (I am not feeling very chatty or ambitious tonight.)


Here he is with no ears.


The ears before plaster cloth.


The first ear is plaster cloth'd and attached.


The second ear is plaster cloth'd and attached.


How he looks from the back.


He still has a long, long way to go...and this is an experiment in making what is mostly turning into a dog.

It is very likely that his look will continue to change.
Related Posts Plugin for WordPress, Blogger...