new project...and accepting physical limitationsSeveral months ago my fellow artist friend Juana Moore gave me a 48-inch long hard cardboard tube when I started collecting cardboard tubes for my Studio Snake. The tube Juana gave me was way too good to use for the Studio Snake, but I layered it with plaster cloth back then and set it aside with no specific idea in mind...other than I knew I wanted to make something big with it.
trying to show how l-o-n-g this tube isI am working on starting my Studio Snake (I wrapped a huge basketful of cardboard tubes with masking tape a few nights ago), but in the meantime I had a minor brainstorm and was inspired by this little guy that sits on my cable modem. this little inspirational guy is posing on the plaster cloth layered tubeObviously I am going to make a snake with this tube as the main part...but I will show more later as it develops.Okay...onto other stuff.I need to pull good prints of two carvings for that upcoming show in Detroit. I am not having very good luck. I am fully aware that I need to learn by doing and keep practicing until I "get" the feel of printing and understand more about using various inks and carving materials and papers...wow, there are SO many kinds of paper!But I also learned tonight that I need to accept that I may not be a printmaker. I really really love carving the blocks. I really enjoy finding creatures and images in the "automatic drawings" in my sketch book. However, after going meticulously through each step of the printmaking process tonight...over and over and over again...being very careful and keeping all of my work areas clean, etc. -- like Shaqe taught us in class -- I have to admit to myself that this is just plain physically painful for me. I made over 20 prints tonight...not one of them was acceptable. There is a major flaw in each one...some are better than others...but each one is too flawed to frame up and submit for the show.
  This is one of my designs that was accepted for the show -- and I cannot pull a good print from it to save my life. I even tried cleaning up the carving. I tried to tidy up the lines of the leaves. It just isn't happening. These are the worst two prints.
 These are the best four prints. I just need more practice. I need to do this a billion more times.I know I will get better at it, but it is just too soon for this show. That, and I am not happy with the way the carving has been altered slightly by the clean up of the lines.I'm not complaining or making excuses. I'm just stating facts. It's a learning process and I am a beginner. Period.
 This is a detail from the best of the tree guy prints. You can see that even though I tried to re-carve some of the leaves, the lines of the branches are flooded with ink and it is just a mess.And yes, I did clean the block a couple of times during the printings...LOL.
 I had to scrap the printing of the other design that I originally submitted to the show. I got the okay to choose a different print, and these are the three best prints from tonight...but none of these are good enough for my liking. I will try this one again tomorrow, and maybe I will be able to pull a decent one after a good restful night's sleep. I hope so anyway.
 This was the best one of the three. Wow...I went through SO much good paper tonight...this is getting pricey...sheesh.Juana helped me name this piece. I knew it was a fox-creature and we came up with "Kitsune"...a Japanese fox spirit.This print is almost good enough...
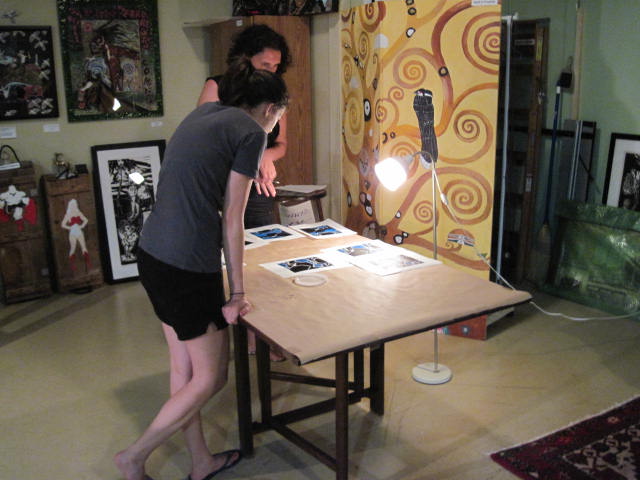
 ...but the face isn't printed well enough.Fingers crossed for a successful print tomorrow!It absolutely kills my back to stand and work on the prints at the table. At the printmaking class the table was a little bit shorter and it was even harder (physically). Tomorrow I will try some at the marble table in the kitchen, which is slightly taller than the long dining room table. I will also try the kitchen counter by the dishwasher...there is room over there and it is the tallest surface in the house...maybe that will help. I have a couple other physical problems that are getting in on the act, too...but hey...I am doing pretty well for someone my age who has never been physically fit. I will manage to overcome this...plus I need to practice more!
coffee, conversation, roller derby and Art-o-matWhat a delightful time -- I met up with Jennifer Lenardon this morning for coffee at Tuscan Cafe in Northville to talk about her upcoming Arto-series...it is nearly ready!You may remember I was a volunteer for the Detroit Derby Girls for a few years. At one point I was also a DDG Sponsor with Michigan Art-o-mat. During that time period several skaters and another volunteer became interested in Art-o-mat and expressed a desire to make art for the project but no one had time to do an entire 50-piece series of their own. We put our heads together, cleared it with Artists in Cellophane, and I curated a group series for DDG. One of the participating skater/artists in that series was Seoul Slayer -- a blocker with D-Funk Allstars. Seoul enjoyed making her pieces so much that she decided to do her own series.
 Seoul Slayer is also Jennifer Lenardon, an 8th Grade English teacher at Pierre Toussaint Academy in southwest Detroit. As you can well imagine, between her career as a teacher and her skating/practice/training schedule with DDG, it doesn't leave a whole lot of free time.Well, Seoul managed to get her prototype made and accepted by Artists in Cellophane but then things got put on hold for a bit. She initially started her series in mid-summer 2010 but then she had to go back to work and "that cut 8 hours out of my day." In September of that year she was also back in school herself, taking two classes. And now this summer is almost over and she is back at school/work in 2 weeks...BUT Seoul has set aside a block of time for production of her series. YAY!
Seoul Slayer is coming up on her 5th season skating as a blocker for D-Funk Allstars, one of DDG's five home teams.
 Seoul's solo series for Art-o-mat is called "Block and Chain". She wanted to keep her design simple but symbolize roller derby. "I'm a word queen, not a technical person."
 "Block and Chain" consists of a mini star and four blocks that feature the image of a skate joined together with jump rings. It can be worn as a piece of jewelry or hung as a tiny piece of art."The image of the skate is my actual first pair of skates I used for roller derby."
 "The background on the info card comes from my 15 minutes of fame in a newspaper article in the Redford Observer." The article was about DDG's first Championship Bout at Cobo and it was also D-Funk's first Championship win. Seoul was quoted in the article and you can see her name in the print on the design on the card. "It was cool how it all worked itself together."
 info side of the info card
 some of the mini moo cards that are included in Seoul's seriesThe art pieces come in several different colors and you can see there are a number of different mini card designs...why not collect them all?The process for making "Block and Chain" is pretty time consuming and can be a bit tedious. Seoul says the precision that is required is challenging. Here is what is involved in making her series:
- create the image as a word document and make sure the colors are right
- print out images onto shrinky dink paper
- cut the 2" square 4-part images
- use a corner punch to round off the corners of the images
- use a template for the placement of the holes in each of the squares
- bake all the pieces together for 3-4 minutes (each batch)
- make the the mini star and then bake/shrink it down
- join the 4 squares with jump rings at each corner and add 2 rings to the top for hanging
- attach the tiny star with a jump ring
- print the info card
- attach the assembled piece to the info card
- pack the box with the art, mini moo card and filler/box weight
- label the boxes
- wrap the boxes with cellophane/acetate
- pack up and ship the boxes to Artists in Cellophane
 Yes, it IS a lot of work...but what drew Seoul Slayer/Jennifer Lenardon to Art-o-mat?"It's a fun thing to do and I like that it is portable art. And maybe someone will get into roller derby."Seoul is also curious what people will do with their "Block and Chain" art pieces, besides wearing them as jewelry. She is very interested to hear from her customers and hopes they will drop her a note...make a connection.Watch for "Block and Chain" by Jennifer Lenardon/Seoul Slayer coming SOON to an Art-o-mat machine near you!
we were having too much fun --Juana came over this evening and we looked through a box of Magic: the Gathering cards that I got from eBay.  Then we looked at the variations I came up with for a new label for our collaborative Art-o-mat series called Penciled In. We ended up with this one.Then we went to dinner at Mr. Thai in Northville, then we came back and I fed the cats and then we started playing Magic. We played two games and we were mildly aware of the time.When we started playing the third game it still felt fairly early.We were having so much fun that by the end of the game it was a shock to both of us that it was after midnight! I decided it was a good trade off and that I'd just write about what happened.Before we went to dinner, Juana agreed to help me think up titles for three of my pieces that were accepted for an upcoming show in Detroit. So after we played the last game of Magic we had a piece of Zingerman's coffee cake and started brainstorming. Mostly we laughed and goofed off, but we finally arrived at suitable titles. Oh man...did we laugh!
And that is why I missed my midnight posting deadline.
not much to see todayPrep work day. And errands day. Now a big thunderstorm is rolling in with lots of lightning. I spent close to two hours covering these cardboard tubes with masking tape for use on the upcoming Studio Snake. 
 Also tonight I allowed my computer to do an update and now I can no longer use my old photo editing program that I am used to...the one I use to modify scans and photos. And it looks like I don't have access to the old items either. Juana is coming over tomorrow to play M:tG...perhaps she can help me figure this out...no doubt there is a simple solution. I was GOING to try to work on labels for Penciled In tonight. Oh well. I can't even print the OLD ones. Gah!