Showing posts with label manikin. Show all posts

Wednesday, February 27, 2013

365/2013 - Day 58

done, done, done, and done!

I managed to pull together four pieces for the upcoming show.  The plaster cloth snake, the Atomic Fireball Happy Hour guy, the manikin, and the stuffed spikey creature.  Until they are in place at the gallery, they are feeling a wee bit shy.


Whew -- I need a break!

Monday, February 25, 2013

365/2013 - Day 56

uneventful day

More of the same today/tonight...applying little pieces of paper to the manikin and trying to turn the snake from purple to blue.  I think the manikin is done.  The snake is getting closer...hopefully tomorrow!


Sunday, February 24, 2013

365/2013 - Day 55

awwwww, nuts

I had a feeling I wouldn't be using all seven of the plaster cloth guys.  Some just aren't far enough along.  Some aren't turning out as I'd hoped.  A couple are beyond painting in the amount of time I have left.  But I am still hoping for a few.

You wouldn't think so, but tearing paper takes a LOT of time.  And then adhering the little pieces to curvy surfaces takes time.  Man.


I am really falling in love with this guy now.  I want to do a really good job on him...and that means he will not be going into the upcoming show...just not enough time.


Another plaster cloth guy that will not make it into the show is the marsupial.  One of the several reasons why I am having trouble with his painting is the complicated task I set for myself.  Another is that I have never tried to do this before.  And yet one more reason is the uneven surface of the plaster cloth.  This painting design/style is hard enough but the bumpy surface(s) make it very hard to:
  • get the edges on the layered circles sharp
  • the gazillion tiny dots that go in between the larger layered circles are becoming textured when I try to put them on with the other end of the brush or with an eraser on a pencil -- I found a tiny sponge brush that will probably work but I need more time

I discovered last night that the millions of small dots I want to add (to represent Australian aboriginal-type art) are going to be painstakingly difficult due to the nature of the plaster cloth surface -- I don't mind putting in a lot of time, I just don't have that kind of time for the upcoming show.


More tearing of paper for the manikin guy.

I can't add any more paper bits right now -- he is too wet -- needs to dry a bit so I don't tear the pieces I already applied.

And another thing I learned tonight about painting/using colors...if you have a carbon black snake and you try to add phthalocyanine blue to the dry surface to make it look blue, it actually goes waaaaaay dark purple.  WTF?  

It LOOKS like a beautiful dark blue when it is wet on top of the very dry black paint, but it goes purple as it dries.  Even a second and third coat stay purple.


So -- another stab at going blue taught me that turquoise deep will stay blue...at least on top of the other blue (now dry as well).


They are both very appealing blues...it's just taking longer than I anticipated to get to the next step!  Gah!
I will finish all of these guys...but at a more reasonable pace.

Ah well -- live and learn. 

Saturday, February 9, 2013

365/2013 - Day 40

wow -- FULL day of work

I set a plan for myself for this weekend.  I know what I need to do and in what order.  This was a non-stop work day and I am glad it is over because I am really tired now.  LOL.

Today I focused on the Atomic Fireball Happy Hour guy, the manikin, and the marsupial guy.

AFHH needed the most attention.  I had to go and get floor flanges and pipes for his legs.  When I got back home I went shopping in the basement and found the perfect base for him -- I came across a lamp I got from someone's trash pile during the summer.  I took off the electrical parts and knocked the base loose with my rubber mallet.  It took a lot of drilling with the Dremel tool and repositioning the flanges and trying again and drilling again and repeating all the steps but I finally got it right.  Now I just hope that the plaster cloth will cover the flanges -- they are rusting and the color is coming up through the plaster cloth.  It will just take extra gesso and paint but it will all work out.  What I am worried about is getting the plaster cloth to adhere to the flanges and wooden base and not crack at the seams.  I can always cover it all up with paper and then paint but I'd like it to work in the plaster cloth stage.

LOL -- look at all of those holes!


Then it was time to start thinking about if I really wanted him to have fingers or just give him rounded off paws.  I was hesitant to drill the wooden balls and I knew the holes would be close but what the heck -- I gave it a go.  I had a bag of wooden skewers left from another project and they were a pretty close fit with the holes that the Dremel made.


He looks so wacky -- like he has magical waves coming out of his hands or something.  Next it was time to choose a length for those fingers.


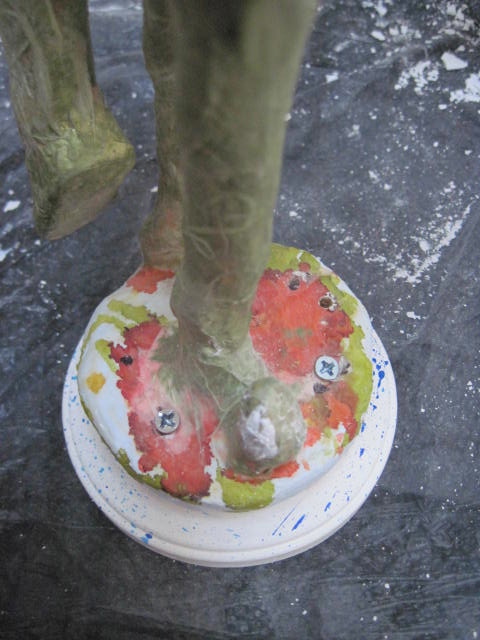
I set him aside and moved on to putting a base on the manikin.  He has that built-in base and he does stand up but the way I have him posed he is a teensy bit tippy.  If you just have him on a table top or shelf he is fine...but I was worrying that he could accidentally get bumped in a show setting so I decided to add the extra base.  It makes him more stable.  I am just not terribly skilled at drilling and I didn't want to mess up what I had already done to him.

figures, doesn't it???  just that much too long!


Okay -- time to start the plaster cloth!

The clutter and mess on the table was driving me nuts so I cleared it off, changed the table coverings, and started fresh.


I was not looking forward to keeping track of all of those fingers -- they go in specific holes because my drilling is so uneven.  Then it dawned on me that I could leave them in place and work on each finger, one-at-a-time style.  Duh.


Now...on to blending/covering the flanges and attaching them to the base.


That was a very lengthy process...and a very wet and messy one, too.  I cleaned it up and set the whole thing aside to dry (partially) overnight.  I will try to do more with it tomorrow...at least see what else I can do with it.  For now, I am happy with the progress.


Next it was time to put the two bases together on the manikin...another wet and messy job that will need to sit overnight.


Last (for today) -- I needed to add an inside seam to the marsupial's pouch.  I can't get my hand all the way down to it so I had to poke at it with longer, reachy things...scissors, Sharpie, etc.  I got the seam done but it isn't as smooth as I'd like it.  I may try again tomorrow to smooth it out.  I also worked on the bottom edge of the torso/column.  This is another let it dry overnight project to see if the seam is going to crack.  Again, I can find workarounds for it but I would prefer it to be taken care of in the plaster cloth stage.  Tomorrow I also need to give most of the entire marsupial guy more layers of plaster cloth just to toughen and strengthen it.


 And here are the three guys resting for the night.


Whew -- I didn't feel it at the time, but now I am really glad I stopped work when I did.  I am BEAT.


Sunday, February 3, 2013

365/13 - Day 34

working on plaster cloth guys

Today I got started early working with plaster cloth which is pretty unusual -- plaster cloth seems to be primarily a late-afternoon-to-late-into-the-night activity for me.

The Universal collaborators dropped in at around 10:15 this morning and started poking at me.  By 10:30 I was wrist-deep in plaster cloth...trying to round off the Atomic Fireball Happy Hour guy's head.  I ended up using a lot of plastic bags and wrappers to give me a basic shape to build on -- including all of that discarded plastic wrap that I used to protect the manikin yesterday.


Not too bad.  I still need to do the sides of his head in front of his ears and maybe part of his jaw area.  I am surprised it is as even as it is.

I was also surprised to look back through the blog and find that I was working on this guy way back on November 29, 2011 -- it looks like that is the day he got his antlers/branches.  See that blog entry here.


Shortly after I was done with that session of plaster cloth I came into the studio to go through my collages that are in progress.  I chose the most recent one (it started out as a painting of lemons).  I have been having trouble seeing anything in it but today when I stood it up by the door and turned it one time it was instantly obvious that this is another dog.  Wow.  I don't know how I missed it before.


I started adding in some faint pencil lines and then I printed out a couple of copies to draw on.  I am playing around with two or three ideas right now, but here is the basic look.


And then later on in the afternoon I needed to work on plaster cloth again.  I thought I was going to get back to the branchy guy but I just wasn't feeling it.  Instead I worked on strengthening all of the parts of the guy from last night with the long horns.  He got at least four layers of plaster cloth on all of the sides of his torso, then I worked on the joins for his legs and arms, then I moved on to the face and neck and head.  His torso was as smooth as his face when I first started out.  I may go back and smooth it out again when I put the next layer of plaster cloth on his horns...but maybe by then I will have come up with more of a back story for him and he may want to have an uneven surface.  Dunno yet.


Oh -- I also gesso coated the manikin this afternoon.  I might have an idea for him now...yay.  

And here are all of the plaster cloth guys drying together tonight.


Related Posts Plugin for WordPress, Blogger...