Showing posts with label process. Show all posts

Monday, April 9, 2012

2012/365 - Day 100

wow -- what?

Wow -- it sure doesn't feel like we are one hundred days into the year already. 


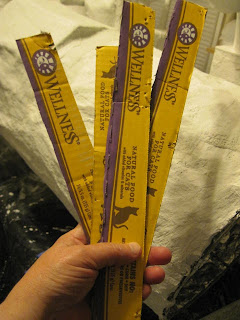
Last night I was cutting up the cardboard trays that the cat food cans come in.  Today I realized that I could use the ends of the trays, too.  Duh!


I cut the strips into little pieces...


...and they work pretty darn well to fill in gaps between the tomato cage grid and the chicken wire inside of the base...however...


...there are still some areas underneath the tomato cage and chicken wire where the chicken wire doesn't touch the aluminum foil.  I will still have to figure that part out before I try to add masking tape and plaster cloth.

It is sort of strange re-starting a project like this.  The cat-creature's chicken wire base was done so differently compared to this one.  To come back and try and work out the mistakes in this goat-creature quite a challenge.
Saturday, January 14, 2012

2012/365 - Day 14

feeling a bit overwhelmed

When I was painting Chime Cat I had a lot of help relaxing...tonight it sure feels like that may have been the only way I was going to get through it...and I may need to resort to that method for the cat-creature. I am feeling (quite) a bit overwhelmed.

I wasn't able to locate the glaze colors I was hoping for so I had to mix it myself. It looks to be the right consistency (compared to the other colored glaze I have) and it is acting like that other colored glaze, but I just don't know. I think I am probably overthinking things and just choking at too many possibilities and choices.

I am going to leave the small areas I worked on alone for the rest of the night and look at them fresh tomorrow. I kinda think I have made things too complicated for myself (at least at this point in my learning process with paint) and I need to just calm down and make things as simple as possible.

I also tried out tiny sections of the other idea I had for the body/base of the cat-creature. The jury is still out on that, too.


BUT --

Today I had a really great time with Ruth. She took me out to lunch for my day-after-my-birthday day and we also went to an art supply store and I used a lot of that gift card my sister gave me.

I got a bunch of paint, a large bottle of acrylic glazing liquid, a reeeeeeeeeally nice angle brush, and a carving block that I have never seen/tried before.


I also got twenty sheets of a mid-range handmade paper in several different colors.


I am testing out the idea of papering the base/body...not sure if I will do it or not.


I tried out the paint and glaze on a section of the Studio Snake.

This is the plain paint.


This is the paint with the glaze over it and next to it is just the glaze.


This is the Studio Snake section with the cat-creature's hand to show the difference. I dunno...


This is a small section of the cat-creature's face with just the glaze on it. Again, I dunno...


I also think I will continue to photograph it in its various stages, but these will be the last process photos of the cat-creature I post in the blog until after I complete it and deliver it to the Members Show at the Northville Art House at the end of the month...mostly because I want it to be a surprise.

Monday, October 31, 2011

365 Day 304

the yarn arrived today


A couple of days ago I purchased two skeins of Moda Dea Wild yarn (on eBay) in a color I haven't used before -- russet.

It turned out to be pretty cool. It has a lot of variation in it and looks quite different in each of the last 32 (of 90) Tookies I am working on for Art-o-mat. I use this soft soft super soft yarn on the bottom edge of the Tookies finger puppets...where your finger goes in. It feels so nice.

Now these last 32 just need their "hair" and I can start the packaging part of the process.

Tuesday, August 2, 2011

365 Day 214 -- Another Experimental Night!

exploring pattern through floral and positive shapes

This Experimental Night led by Shaqe Kalaj at Art & Ideas Contemporary Gallery in Plymouth, MI was another pretty cool experience for me.

In her note to us, Shaqe said about this class: "This class to me is an experience that focuses on process and opening to new possibilities and ways of thinking and experiencing through our senses. I have many ideas to really bring out the best in you all. So last night I had everyone choose a sheet of newspaper. Then we drew silhouettes of flowers. The big idea behind the class is layering and thinking of this as collage. I like to isolate techniques so that you can think of using it in new ways and in your own work. Sometimes we work in certain habits and I like to open up new possibilities with it."


We started out with a bunch of silhouettes of floral shapes.


Then we chose a newspaper page from a pile that we would be using as the paper to work on.


Next we chose some of the floral images and drew our interpretations of them by hand -- just concentrating on the overall shape of the image.


Then we started to paint over the drawings...layering color over the words in the newsprint and building up the colors of the flowers.

While we were all working, Shaqe talked to us individually about our styles and what else we could bring to the piece to make it our own.

Shaqe suggested (strongly...LOL) to me that I could add one of my newly-discovered creatures. The page could be turned in any direction, etc.

If you know me, you know I choked...I didn't have my sketch book or tracing paper. Yikes...I was going to have to use the technique we were working with and add in a creature I made in my head on the spot by making a silhouette of the shape of the creature and then layering on the features.

Basically, I was not in the head space to "argue" with Shaqe or put up much resistance, so I complied and gave it a shot. And I am really glad that I did!

I started making a shape with a dark blue paint. I was trying to see it completed, and then work backwards. I over-think things too much. When I gave in to the process and just allowed the shape to happen it started to feel better. When I wasn't trying to force a finished product I was able to just allow the thing to make itself...adding triangles of color, a tail, tummy, and ears. I kept adding to the bottom of its legs. I dipped the brush into some really thick paint and dabbed it onto the creature and the brush made little dots that were really cool...it happened accidentally and I really liked it.


I like those dots a lot.


I am in no way trying to suggest that this is a masterpiece or that it is in any way even close to Lynda Barry's work...but when I was painting in my creature it was reminding me of something. I couldn't put my finger on it, but it was something familiar.

When I got home it hit me...I looked straight through the kitchen to the Lynda Barry "Bird" that was given to me by Francine Rossi. And it is funny, I was looking at this piece several days ago when I was looking at some of my collection in that area of my house.


I LOVE this piece so much.

It is such a joyous, happy, FUN piece of art! And I love crows so much...and a crow with a crown, bonus!


"Bird" is painted on a page from a book that was turned upside down.

I love the layering and that you can see the words through the paint.

I love everything about this wonderful work by Lynda Barry.


Find out more about Lynda Barry in
this article from the New York Times. Watch the slide show -- it is really great.

I have one of Lynda Barry's workbooks, too...I need to pull it out and maybe combine the in person experience from Shaqe Kalaj's Experimental Night with Lynda Barry's teaching methods and see what happens!

Saturday, July 30, 2011

365 Day 211

almost ready to ship

I got farther than I expected to today in the process of preparing the Penciled In blocks and boxes for shipping to Artists in Cellophane, aka Art-o-mat HQ. I actually only need to put on the cellophane/acetate and put them in a shipping box...and take the boxes to the post office.


close up on the labels


Last night I ran the pages that I printed the label images on through the Xyron machine to be made into stickers. Last night I also trimmed them and put half of them onto boxes.

This morning I put the other fifty on the boxes and bundled them all up.


There are 20 characters with 5 coloring variations of each. Because I already scanned them for the Penciled In blog and also posted the photos as entries with numbers on that blog I decided to do one more labeling step. It was a little tedious but in the long run it will make things easier for Carol when she pulls my artpacks for orders. She will be able to tell what is in the box and that will make it easier for her to give a host an assortment rather than possibly ending up with say 4 out of 5 of the cats with crowns in one order.


So I made a label that says in general what is in the box (young rabbit in this case). I also wanted to make it easier for new owners to identify their characters on the blog...so I made a label for that as well, leaving a blank spot for me to fill in as I packed the boxes.


ooh...pretty colors of tissue paper and cool mini moo cards


A Penciled In artpack labeled and ready to be stuffed with the block, info insert and mini moo card...all wrapped in tissue.


the five "big dog" art packs stuffed, and numbered/labeled


the box is starting to fill up...


THAT'S what I like to see -- 100 artpacks ready for acetate. I think I will probably do that tomorrow.

Friday, July 29, 2011

365 Day 210

coffee, conversation, roller derby and Art-o-mat

What a delightful time -- I met up with Jennifer Lenardon this morning for coffee at Tuscan Cafe in Northville to talk about her upcoming Arto-series...it is nearly ready!

You may remember I was a volunteer for the Detroit Derby Girls for a few years. At one point I was also a DDG Sponsor with Michigan Art-o-mat. During that time period several skaters and another volunteer became interested in Art-o-mat and expressed a desire to make art for the project but no one had time to do an entire 50-piece series of their own. We put our heads together, cleared it with Artists in Cellophane, and I curated a group series for DDG.


One of the participating skater/artists in that series was Seoul Slayer -- a blocker with D-Funk Allstars. Seoul enjoyed making her pieces so much
that she decided to do her own series.


Seoul Slayer is also Jennifer Lenardon, an 8th Grade English teacher at Pierre Toussaint Academy in southwest Detroit. As you can well imagine, between her career as a teacher and her skating/practice/training schedule with DDG, it doesn't leave a whole lot of free time.

Well, Seoul managed to get her prototype made and accepted by Artists in Cellophane but then things got put on hold for a bit. She initially started her series in mid-summer 2010 but then she had to go back to work and "that cut 8 hours out of my day." In September of that year she was also back in school herself, taking two classes. And now this summer is almost over and she is back at school/work in 2 weeks...BUT Seoul has set aside a block of time for production of her series. YAY!


Seoul Slayer is coming up on her 5th season skating as a blocker for D-Funk Allstars, one of

DDG's five home teams.


Seoul's solo series for Art-o-mat is called "Block and Chain". She wanted to keep her design simple but symbolize roller derby.

"I'm a word queen, not a technical person."


"Block and Chain" consists of a mini star and four blocks that feature the image of a skate joined together with jump rings. It can be worn as a piece of jewelry or hung as a tiny piece of art.

"The image of the skate is my actual first pair of skates I used for roller derby."


"The background on the info card comes from my 15 minutes of fame in a newspaper article in the Redford Observer."

The article was about DDG's first Championship Bout at Cobo and it was also D-Funk's first Championship win. Seoul was quoted in the article and you can see her name in the print on the design on the card.

"It was cool how it all worked itself together."


info side of the info card


some of the mini moo cards that are included in Seoul's series


The art pieces come in several different colors and you can see there are a number of different mini card designs...why not collect them all?


The process for making "Block and Chain" is pretty time consuming and can be a bit tedious. Seoul says the precision that is required is challenging. Here is what is involved in making her series:
  • create the image as a word document and make sure the colors are right
  • print out images onto shrinky dink paper
  • cut the 2" square 4-part images
  • use a corner punch to round off the corners of the images
  • use a template for the placement of the holes in each of the squares
  • bake all the pieces together for 3-4 minutes (each batch)
  • make the the mini star and then bake/shrink it down
  • join the 4 squares with jump rings at each corner and add 2 rings to the top for hanging
  • attach the tiny star with a jump ring
  • print the info card
  • attach the assembled piece to the info card
  • pack the box with the art, mini moo card and filler/box weight
  • label the boxes
  • wrap the boxes with cellophane/acetate
  • pack up and ship the boxes to Artists in Cellophane


Yes, it IS a lot of work...but what drew Seoul Slayer/Jennifer Lenardon to Art-o-mat?

"It's a fun thing to do and I like that it is portable art. And maybe someone will get into roller derby."

Seoul is also curious what people will do with their "Block and Chain" art pieces, besides wearing them as jewelry. She is very interested to hear from her customers and hopes they will drop her a note...make a connection.


Watch for "Block and Chain" by Jennifer Lenardon/Seoul Slayer coming SOON to an Art-o-mat machine near you!

Sunday, April 17, 2011

365 Day 107

documenting process (and progress)

This blog keeps me moving forward. It helps me to keep on track, to stay focused and to feel productive because I can look back and see what I've done each day.

But it also functions as a way for me to remember how I did something...what the steps were, in what order I did something, etc.

Today I found that I still needed to add more yellow underneath another layer of orange. Yesterday I was thinking I was ready to move on to the next step(s)...but today it was pretty clear that I needed to go one more layer to build up the colors.

I am a person who likes to work with paper. I love cutting paper images for collages. I enjoy wrapping gifts. There are all kinds of things I do with paper. Today I can say that I am enjoying adding color with layers of tissue paper. Even though in reality there is probably a lot less control over the results, I feel more in control than with paint. I am not comfortable with paint. I don't understand paint(s) and I don't really care for it as a material/supply. I paint because I have to sometimes. I stomp, I pout, I procrastinate, I whine and complain...but I usually end up painting. Accidentally "discovering" that I can add color with paper a few days ago -- today I feel really enthusiastic about it. I don't dread it. I feel like I was led to it. Yay.

I am going on and on about this because I know at some point I will be re-reading this drivel and I will see that I needed to work through all of this and find my true comfort levels and the things I am really truly drawn to. I just basically need to document things for myself.


starting off today with my "tools"...triangles of tissue paper, brush and matte medium


adding a yellow triangle of paper


every edge, every surface gets touched and smoothed...I like this


building up the colors -- not very time efficient, but boy oh boy is it ever satisfying (to me)


stepping back to take a look


letting it dry for a bit

Sunday, February 13, 2011

365 Day 44

I've got my work cut out for me...

Carol at Art-o-mat HQ said "make more finger puppets", so I am. But I think I will make 100 instead of 50...if I just do it now -- and in assembly line fashion while I am still in the mood -- I think that will be really good and should go more smoothly.

I started to count out 100 of the fingers that I had left that need 2 seams. Two problems. One, I only had 82 two-seamers left. Two, some of them were looking like they were going to fight me a little. I knew that there were still some gloves available locally so I ran up there and grabbed some more. I was only going to get adult-sized ones but I caved and got some kid-sized ones, too because of the colors. More on that later.

Okay. The process in prepping the gloves goes something like this...


The gloves come packaged two pairs to a set, so you have to cut them apart (cut out those annoying little plastic things) and then you cut off the wrists.


As you are cutting off the wrists you separate the gloves into matching piles.


Here is a glove without the wrist.


Next cut off the thumb.


Now you cut the fingers apart. This makes 2 sets of fingers: one set that requires 1 seam and one set that requires 2 seams. For this new set of 100 Art-o-mat "Tookies", I will be using all two- seamers.


I set aside the one-seamers (for another project).


And here are the 100 two-seamers for this set of Art-o-mat "Tookies".


This is why I didn't want to get kid-sized gloves. The bottom edge that gets turned in is shorter than on the adult-sized gloves. It most likely will be okay, but those are the ones that turn out shorter on your finger.


Another reason is the edges of the fingers on the kid-sized gloves also tend to curl up more easily when I am trying to work with them. But the reason I DO like the kid-sized gloves is that they come in solid colors, and colors that are not offered in adult-sized gloves. I have never had a solid gray before. I really like them.


And here are the results of my prep work today. I also sorted the remaining items into little bins and labeled them (yay!) instead of just dumping them into the larger yarn-and-sewing-bin (that needs to be sorted out, too).


And look -- some of the thumbs from today's adult-sized gloves look like they might be able to be used for a different sort of puppet later on. The gloves this year have been from a different manufacturer than I have had in the past. The other older remaining thumbs (in the unsorted larger bin) are all very stubby and thumby. I use those as decorations sometimes on other puppets.


Hopefully I will be able to work on these in a more organized sort of assembly line manner. I would like to put ALL of the eyes on first. Then do ALL of the side seams, etc. We'll see how it goes...

In the meantime, I will still be working on other projects and cleaning and organizing.
Related Posts Plugin for WordPress, Blogger...