Monday, December 26, 2011

365 Day 360 -- part 5

experimental arms for an experimental plaster cloth dog

Okay -- one last quick project for tonight!

I made arms for the dog. I wanted them to be simple but I didn't want to spend as much time on them as I did on Chime Cat's arms. Although Chime Cat has simple-looking arms, they took me a long time to make and they frustrated me a bit because they are not even...but I guess that is part of Chime Cat's charm.


For these arms/paws I decided to skip the claws because there will be plenty of stuff to look at with the tie and clothes. And like I said, I wanted arms similar to Chime Cat.


I used one of those swimming pool floaty bopper things and cut it in half. I used two super long paint stirs for underneath to keep their straight shape. Three layers on top and bottom, then three layers of triangles to hold the plastic caps (thanks, Suzanne!) on and that was that.


I used vinyl exam gloves for this project to see how it would go with gloves on. I tried it once before with a different brand (size large) and the fingertips were too long. These are also a size large but are a little smaller. I still need a medium to fit better. But man -- what a joy! They even kept the plaster cloth wetter and slid the plaster around easier...I guess my hands absorb it. AND I don't have to soak and scrub the plaster residue off of my hands...yay!


I gave the arms rounded paws and cuffs for the sleeves. Even though they weigh a LOT, I think they will be fine. I like how they look.

I am going to have to do the smoothing and tweaking layers to the dog before I put on the arms and the collar and tie. But I am done for tonight!

365 Day 360 -- part 4

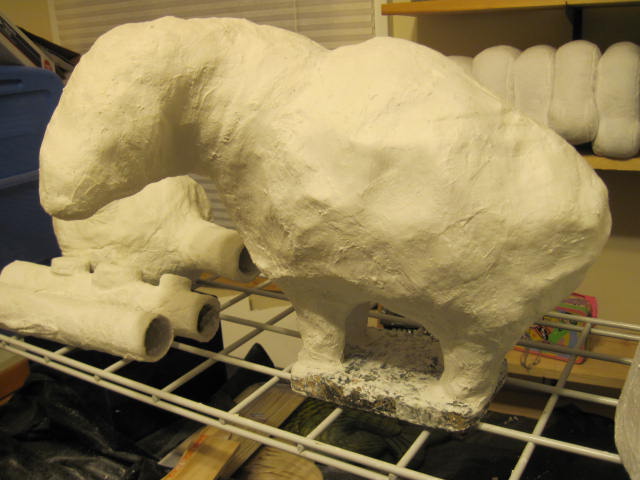
closing up the base on the experimental plaster cloth dog


Heh -- this was the view from my desk this afternoon. It was looking a little wacky in here.


This afternoon I made the decision to close up that last part of the base on the experimental plaster cloth dog. Maybe I will leave a section open on another creature...I didn't think this one was structurally suited to it.


At this stage you could still easily see the "hanging out of his pants shirttail" part. Once I started covering the paper bags with the plaster cloth it became harder to see distinguish it.

Some of the plaster cloth when on top, some went underneath.


I am going to try and paint it so that you can tell his shirttail is becoming partly untucked. (yeah, right)


And now it looks like things have settled down a bit again.

365 Day 360 -- part 3

maybe these???

Maybe this is the guy that these antlers/horns were made for -- hmmm...


I tried the pieces in a billion combinations, and this is how they look the best.

They are temporarily taped on for the photos...I can hear the tape releasing from over here...LOL.


I think with these horns/antlers that this guy could maybe be some sort of deep woodland elemental...like a guy from M:tG.

365 Day 360 -- part 2

looking at some eyes

It is funny to me how much the look of the face changes with different sized eyes, and with the other elements added. (I think the reason the small eye looks somewhat better is because of that pesky black marker mark on the plaster cloth, giving it an outline.)


small eye, unpainted


small eye, painted


medium eye, painted


large eye, painted


small eye, large pointy horn, small pointy ear


small eye, large pointy horn, short rounded ear


small eye, stubby horn, short rounded ear


small eye, stubby horn, long pointy ear


medium eye, stubby horn, long pointy ear


large eye, stubby horn, long pointy ear


To me in these photos, the small eye makes the guy look like a slightly more "real" creature. The medium eye makes him look a little surprised and the large eye makes him look like a stuffed animal.

365 Day 360

how do I look?

This morning I have been playing around with possible looks for the repurposed horse statue creature. I don't know what I am going to do with him yet. This is just a small sample of the photos I took and the different combinations of horns and ears.


plain


Shadows on the plaster cloth suggested placement of eyes, nose and mouth...but it probably won't stay like that.


wide-spaced long pointy horns + long rounded ears


short rounded ears + long curved horns


long rounded ears + stubby horns


ridiculously large cat-ish ears placed to the side of the head + stubby horns


pointy ears + long forehead horns


short rounded ears + backwards tilting long pointy horns


short rounded ears


stubby horns become short pointy ears


I am starting to like the idea of glow-in-the-dark Fimo horns of some sort.

Sunday, December 25, 2011

365 Day 359

possible image for January's ATCs

Yesterday while I was sorting things (again) in the studio, I found two tablets of tracing paper. They had been in the very bottom of an old Rubbermaid bin that was full of paper stuff that I have been saving for years and years. I didn't think much of it at the time...just "cool -- more tracing paper." Last night when I needed a piece of tracing paper I grabbed one of the tablets and this full size page fell out. I don't remember exactly where the image came from but it looks to me like I traced a "real" bear for a simple outline to carve, leaving one plain/smooth and doing one fuzzy. I thought "ooh -- neat -- I will do something with these guys sometime."


This morning they were really bugging me.

I have been a bit stumped for an idea for the ATC exchange for January. The theme is Weather.

When I was looking at these two guys together I thought it looked like the smooth bear was dry and the fuzzy one was wet. That gave me an idea.


This afternoon I have been playing with the image in my photo program (I wish I really knew how to WORK that program) -- trying to resize it (the guys on the tracing paper are about the size of my hand), photocopying the image and changing the size that way, scanning the newly re-sized image, and then trying effects on it to see if I could make a negative (like I used to be able to do with my old photo program on my old PC). (It's not that the stuff on my Mac can't do what I want it to do -- it's that I don't know how to make it do it. Sometimes I accidentally stumble on a workaround but I never remember how I did it...LOL...and I just do not care enough about computers to take classes.)


So I finally got an image I could use and I transferred it (very messily) with a soft pastel to the carving block.


This is the cleaned up block after I went over the transferred lines with an oil colored pencil (that just happened to be in my desk drawer) -- I couldn't find a wet enough thin line Sharpie...LOL.


This is a group shot of the various stages of what I did today.

On the bottom left is the carved (so far) linocut block...I'm taking it slowly.

In the middle is the test print.

On the bottom right is a photo program doctored version of a scan of the test print...to see what I might be able to do with it.


It has been an enjoyable process (when I let go of the frustration with my lack of computer skills). I like the idea of the bear up to his shoulders in a nighttime snowstorm.

But then again...I might come up with something else now that I am partly on a roll with the Weather theme.

Saturday, December 24, 2011

365 Day 358

keeping busy

Most of my daytime was spent taking things out of my studio that I don't absolutely have to have right in front of me and taking them down to the basement (now that I have room after the giveaway/clear out). I set up two of the 6 ft. white tables and stacked bins on them. I sorted out more things in the studio and by the end of the day I felt like I had accomplished a lot.


Ha -- I think I have finally made pretty darn good use of this storage rack thing. That second shelf has 10 small, sorted out bins on it...AND...I can see into them. Yay.


This linoblock taunts me every time I sit at the computer. I want to carve, but I have to do it in short bursts. I am not so sure anymore that this is totally salvageable, but I am going to keep working on it.


I really like these characters that came out of the automatic drawings in my sketchbook.

I have been wanting to try to make a large-sized one out of plaster cloth, but for now I will be content with...


...this guy filling in as a trial piece.

You can see how this broken up horse statue started out by looking
here and here.


So, this guy mocks me on the "save it for later" shelf daily. Tonight -- inspired by the guys on the linocut block -- I thought I'd give it another go.


The problem I was having previously (I think) was the tilt/turn of the horse's head/neck.


Coming off of the recent lesson(s) with the Scott's Xtreme Rags I decided to try to free form this guy tonight. I just let the rags and tape tell me how to do it.


I was kinda liking the look of this when the nostrils appeared...


...but then (apparently) the guides returned and took over. I was half-feeling like that first nose tonight was looking too horse-like and that I was being kind of cheaty pants-y.


I like this one much better...plus, I am not sure how it will turn out in the end.

And look how much his head is turning -- I was having so much trouble with that before!


I didn't stop to take photos because my hands were reeeeeally plaster-y and because I was working pretty wet so that I could hold the neck in place while it firmed up. (I know that doesn't seem to make sense, but it makes sense to me and if I look back at this I will know what I meant.)


Oooh -- I love that turning head!


In each of these photos I can see a different kind of face.

He is going to need ears. I don't know yet if he is shaggy or smooth or furry or just skin. Will he have horns? Tusks?


another view


Awww...look at his little mouth in this picture...so cute.


Yep, yep, yep...I like this guy now!
Related Posts Plugin for WordPress, Blogger...