Link to Detroit Comics.
Click on a photo for more information.
(note: my "Animal People" can be found throughout this blog)
Wednesday, July 28, 2010
IN the Art-o-mat machine in Northville
Updated: 8-7-10
Here is what is currently in the Art-o-mat machine in Northville at
Solid Grounds Coffeehouse.
I will be changing the art in early August, so grab these while you can!
Here is what is currently in the Art-o-mat machine in Northville at
Solid Grounds Coffeehouse.
I will be changing the art in early August, so grab these while you can!
Tuesday, July 27, 2010
surprised-looking snakes
These two plastercloth snakes are part of a really cool project I am participating in. I am very happy with the way they are turning out.
I will blog about it when I am totally done, but I had to take this picture for now. I just sprayed them with a sealer. (They look kinda limp, but they are actually stiff.)
The snakes look so surprised to be hanging upside down and drying on the tomato cages. It also looks like to me like they have been gagged. This is cracking me up!
Thursday, July 22, 2010
one of the mache pieces from my collection
re-thinking and re-starting
It took me an entire day and evening to scrape the paint off the teef (not "peel" as was suggested would be happening). Thankfully, the teef still glow in the dark...just not as brightly.
I have decided that I really really reaaaaally dislike the way the paint looks on the inside of the jaws and I believe it is due to the glue+cloth combo. The paint is all crackly and has the feel of vinyl or pleather or something.
I also don't care for the building-with-newspaper-balls technique. I pulled the ears and nostrils off totally -- they were loosened during the teef scraping process anyway. I will go with a different method that I recently re-discovered for a different project...Rigid Wrap plaster cloth.
I believe the plaster cloth is what was used for the large mache sculptures that are in my collection. I find it much more satisfying to work with. I am in no way a sculptor, and this is the most effective means I have found (so far).
More later...
Monday, July 12, 2010
Ears, eyes and nostrils -- part one (updated)
I don't want to say that I have totally fallen out of love with this project but I am not as enthused as I was in the beginning.
Hopefully, it will start taking more shape and I will like it again. Or maybe I will figure out how to give it more shape by the time I am ready to cloth mache the outside.
Right now it's looking like a hippohorsecroc.
I have several projects going at once -- which is a good thing because a couple of them need drying time in between steps. But on the other hand it is a kinda not so good thing because I like the other projects more. I think it may be because I just tried out another way of doing this sort of project with a mostly different technique and materials and I think I like that way much better...so far.
I will finish this guy, it just might take a little longer. And who knows...perhaps by working on the other projects and learning more about the other material/technique I might be able to bring some of that back over to this project. Because in the grand scheme of things making this guy was to teach myself the basics of papier mache so that I can make REALLY big things. I have to keep reminding myself that this is my first attempt and it is only one way of approaching mache.
UPDATE: The book I was using at the time of this original post was "Papier-Mache Monsters: Turn Trickets and Trash Into Magnificent Monstrosities" by Dan Reeder. You can follow either link to find more about his fabulous work. (Took, 3/31/14)
Sunday, July 11, 2010
Sketchbook Project materials arrived!
My Art House Co-op "Sketchbook Project" material arrived!
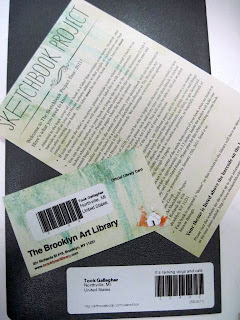
Here is a link for complete information on the project. The sign up deadline isn't until October 31, so you still have plenty of time to join in!
Thousands of sketchbooks will be exhibited at galleries and museums as they make their way on tour across the country.
The tour will make stops at: Portland, ME...Brooklyn, NY... Chicago, IL...Atlanta, GA...Austin, TX...San Francisco, CA...and Seattle, WA...with more stops to be added later.
After the tour, all sketchbooks will enter into the permanent collection of The Brooklyn Art Library, where they will be barcoded and available for the public to view.
You get to choose a theme and a color for your sketchbook from choices listed at the website. I chose this lovely gray color and the theme "It's raining dogs and cats".
I'm feeling slightly shy/nervous but once I get started I know it will be all kinds of fun. I have a billion ideas!
And how appropriate -- I was taking these photos in the bathroom using the skylight for lighting and when I was done it started to thunder a bit and then the rain came.
Pre-painting the insides of the jaws & tongue -- part two
Okay. Half of this is blackwashed and half isn't. (Can you tell which twin has the Toni?)
To me, it just looks like the beast has been chewing charcoal briquets. It is a lot of painting technique (work) for someone who hates painting and then not much to show for it. Not to mention the huge mess.
SO I have made the executive decision to not blackwash the insides of the jaws. There.
Back to the construction in a few days!
Monday, July 5, 2010
Pre-painting the insides of the jaws & tongue -- part one
If you know me in real life, you know how much I dislike painting and trying to choose colors.
Painting, blending, choosing colors is not my strong suit. WHY do I choose/want/need to do these projects that require me to paint?!? LOL. I love color but I really really struggle with selecting what goes with what, etc. I get distracted/dazzled by the colors...and I overthink it.
This step has you paint a dark color on the top of the tongue and then randomly overall. Then while the paint is still wet, you add a lighter color and blend (but not too much) as you go along, then add a third color (or not...but it needed a third color, believe me). After the paint is thoroughly dry, you do a "blackwash" (vs whitewash) with watered down black paint and wipe it off before it dries. So right now I am waiting for paint to dry.
It is kind of hard to tell, but I started with red, added white (making various shades of pink) and later as an afterthought I added in yellow to the insides to make the tongue stand out more and seem more red. In person you can see it better...it is sort of orangey with glimpses of pink and yellow.
I think I may have made the layers too thick because the paint is crackling as it dries. I wonder if it has anything to do with painting on top of glue/cloth? Most likely it is the thickness of the layers. Hopefully the blackwash will hide that. (And somehow -- miraculously -- by the time I get ready to paint the outside, perhaps I will get more of a grip on painting techniques.)
OH -- and allegedly the paint is supposed to peel off of the Fimo teeth when you are all done. Let's hope so.
Saturday, July 3, 2010
surely it's dry by now...
Yes, I imagine it is dry enough to continue work on the papier/cloth mache beasty.
What I need to do is go and get some latex paint. I also need to get a rivet gun for another project but part of that project is at Juana's house and I need to go pick it up. Maybe today, but more likely tomorrow.
In the meantime, the 36mm glass eyes arrived! These are "reptile" eyes according to the taxidermy website I got them from. They look a bit different from the photo example (the one on the left), but I really like them.
I eventually want to get some blank ones and try painting them myself for other projects.
Subscribe to:
Posts (Atom)